Junit5은 유닛테스트를 해야 하는 자바 개발자가 가장 많이 사용하고 있는 test framework이다. Junit5는 여러 단계로 모듈화가 되어있다.
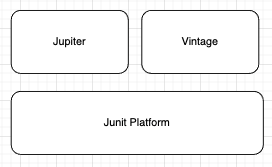
Junit Platform: 테스트를 실행해주는 런처를 제공한다. TestEngine API 제공
Jupiter: TestEngine API 구현체이며 JUnit 5를 제공한다
Vintage: JUnit4, JUnit3을 지원하는 TestEngine구현체이다.
@BeforeAll: 모든 테스트가 실행하기 전에 한번 실행된다. @BeforeAll을 사용하는 메서드는 반드시 static이여야 한다. 또 한 반환값이 없어야 한다.
@AfterAll: 모든 테스트가 실행된 후 한번 실행된다. @BeforeAll과 같이 메서드는 반환값이 없어야 하며 static 이여야 한다.
@BeforeEach: 각 테스트가 실행하기 전에 한번 씩 실행된다
@AfterEach: 각 테스트가 실행되고 난 후 한번 씩 실행된다.
@Disabled: 실행하길 원하지 않는 테스트에 추가하면 테스트 실행시 해당 메서드는 생략된다.
|
1
2
3
4
5
6
7
8
9
10
11
12
13
14
15
16
17
18
19
20
21
22
23
24
25
26
27
28
29
30
31
32
33
34
35
36
37
38
39
40
|
public class StudyTest extends TestCase {
@Test
public void create() {
Study study = new Study();
assertNotNull(study);
System.out.println("create");
}
@Test
void create1() {
System.out.println("create1");
}
@Test
@Disabled
void disabled() {
System.out.println("disable");
}
@BeforeAll
static void beforeAll() {
System.out.println("before all");
}
@AfterAll
static void afterAll() {
System.out.println("after all");
}
@BeforeEach
void beforeEach() {
System.out.println("before each");
}
@AfterEach
void afterEach() {
System.out.println("after Each");
}
}
|
cs |
테스트 이름 표기하기
@DisplayNameGeneration(): 인자로 테스트의 이름을 어떤식으로 지정할지에 대한 strategy를 넘겨서 이름의 셩식을 지정한다. 클래스에 이를 사용하면 해당 클래스 내부의 모든 테스트가 적용을 받는다.
|
1
|
@DisplayNameGeneration(DisplayNameGenerator.ReplaceUnderscores.class)
|
cs |
@DisplayName()
한글이든, 이모지든 원하는 것으로 테스트 이름을 정할 수 있다.
|
1
2
3
4
5
6
7
|
@Test
@DisplayName("새로운 스터디 만들기")
public void createNewStudy() {
Study study = new Study();
assertNotNull(study);
System.out.println("create");
}
|
cs |
Assertion
실제 테스트에서 검증하고자 하는 내용을 확인하는 기능이다.
assertNotNull(): null이 아닌지 체크
|
1
|
assertNotNull(study);
|
cs |
assertEquals: 첫번쨰 인자(expected)와 두번째 인자(actual)가 같은지 체크. 3번째 인자(Supplier)는 옵션이며 실패했을때 띄울 메시지이다.
|
1
|
assertEquals(StudyStatus.DRAFT, study.getStatus(), "스터디를 처음 만들면 상태값이 DFRAT여야 한다");
|
cs |
|
1
2
3
|
assertEquals(StudyStatus.DRAFT, study.getStatus(), () -> {
return "스터디를 만들면" + StudyStatus.DRAFT + "상태다.";
});
|
cs |
위 두 연산의 차이는 3번째 인자, 즉 스트링을 연산하는 비용에 있다. 첫번째 예시는 테스트 실패 여부와 관련없이 스트링을 연산한다. 람다를 사용하게 되면 테스트가 실패했을 때만 스트링을 연산한다.
assertTrue(): 첫번째 인자(condition)가 참인지를 검증;
|
1
|
assertTrue(study.getLimit() > 0, "스터디 최대 참석가능 인원은 0보다 커야한다");
|
cs |
assertAll(): 인자로 넘긴 테스트를 모두 실행한다.
단순히 assert만을 사용해 테스트를 진행할때 assert하나가 실패하면 하위에 있는 assert는 실행되지 않느다. 이를 해결하려면 assertAll()을 사용하면된다. assertAll()을 사용하면 실패여부와 관련없이 인자로 넘긴 테스트를 모두 실행한다.
|
1
2
3
4
5
6
|
assertAll(
() -> assertNotNull(study),
() -> assertEquals(StudyStatus.DRAFT, study.getStatus(),
() -> "스터디를 만들면" + StudyStatus.DRAFT + "상태다."),
() -> assertTrue(study.getLimit() > 0, "스터디 최대 참석가능 인원은 0보다 커야한다")
);
|
cs |
assertThrows(): 예외처리가 제대로 되었는지 확인한다. 첫번째 인자로 예외처리가와 관련된 Exception 클래스를, 두번째 인자로는 예외를 체크할 메서드가 온다.
|
1
2
|
IllegalArgumentException exception = assertThrows(IllegalArgumentException.class, () -> new Study(-10));
assertEquals("limit은 0보다 커야한다", exception.getMessage());
|
cs |
assertTimeOut(): 테스트가 제한시간 안에 끝나야 할 경우 사용된다. 첫번째 인자로 제한시간을, 두번쨰 인자로 테스트의 대상이 온다. 하지만 assertTimeOut()은 두번쨰 인자로 넘긴 로직이 모두 수행될때 까지 기다린다. 만약 첫번째 인자로 넘긴 제한시간이 지났을때 두번째인자로 넘긴 로직 수행완료 여부와 관련없이 테스트를 끝내고 싶다면 assertTimeoutPreemptively()를 사용하면 된다. assertTimeoutPreemptively()는 두번쨰 인자로 넘기는 로직을 별도의 스레드에서 동작시키기 때문에 문제가 발생할 수 있다는 점을 염두해야한다.
|
1
2
3
4
|
assertTimeout(Duration.ofMillis(100), () -> {
new Study(10);
Thread.sleep(10000);
});
|
cs |
|
1
2
3
4
|
assertTimeoutPreemptively(Duration.ofMillis(100), () -> {
new Study(10);
Thread.sleep(1000);
});
|
cs |
조건에 따른 테스트 실행
만약 어떤 테스트를 자바 버전, 환경변수 등에 따라 실행여부를 결정해야 한다면 assume을 사용하면 된다.
|
1
2
3
4
|
//환경병수 TEST_ENV가 LOCAL이면 이래의 테스트 실행
assumeTrue("LOCAL".equalsIgnoreCase(System.getenv("TEST_ENV")));
Study actual = new Study(10);
assertTrue(actual.getLimit() > 0);
|
cs |
또는 assumingThat을 사용해 위 코드를 다음과 같이 사용할 수 있다.
|
1
2
3
4
|
assumingThat("LOCAL".equalsIgnoreCase("TEST_ENV"), () -> {
Study actual = new Study(10);
assertTrue(actual.getLimit() > 0);
});
|
cs |
만약 어떤 메서드 자체에 조건을 걸고 싶다면 @Enabled()를 어노테이션을 사용하면 된다.
|
1
2
3
4
5
|
@EnabledOnOs(OS.MAC)
public void createNewStudy() {
Study actual = new Study(100);
assertTrue(actual.getLimit() > 0);
}
|
cs |
@EnabledOnOs(): OS종류, @EnabledOnJre(): Java version, @EnabledIfEnvironmentVariable(): 환경변수
|
1
2
3
|
@EnabledOnOs(OS.MAC)
@EnabledOnJre(JRE.JAVA_8)
@EnabledIfEnvironmentVariable(named = "TEST_ENV", matches = "LOCAL")
|
cs |
태깅과 필터링
만든 테스트가 여러개일때 일부 테스트를 그룹화할 수 있다.
@Tag()어노테이션을 사용해 임의의 그룹을 만들 수 있다.
|
1
2
3
4
5
6
7
8
9
10
11
12
13
14
|
@Test
@DisplayName("새로운 스터디 만들기")
@Tag("fast")
public void createNewStudy() {
Study actual = new Study(100);
assertTrue(actual.getLimit() > 0);
}
@Test
@DisplayName("스터디 만들기 slow")
@Tag("slow")
void create1() {
System.out.println("create1");
}
|
cs |
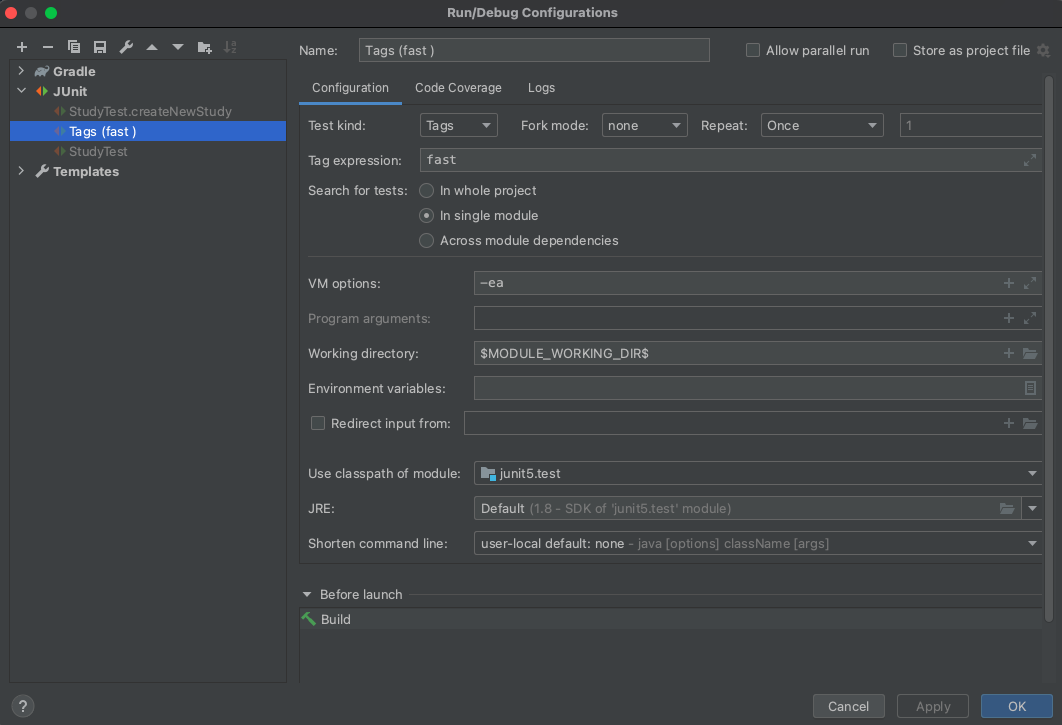
그 후 intellij를 기준으로 edit configuration의 configuration에서 test를 tags로 바꾸고 테스트를 하길 원하는 그룹에 해당하는 tags를 입력하면 된다.
만약 gradle에서 설정을 하길 원한다면 다음과 같이 설정하면 된다
|
1
2
3
4
5
6
|
test {
useJUnitPlatform{
includeTags 'fast'
excludeTags 'slow'
}
}
|
cs |
커스텀 태그
Junit5에서는 메타 어노테이션을 사용해 커스텀 어노테이션을 사용할 수 있다.
|
1
2
3
4
5
6
7
8
|
//SlowTest.java
@Target(ElementType.METHOD)
@Retention(RetentionPolicy.RUNTIME) //어노테이션이 얼마나 유지될지 결정
@Test
@Tag("slow")
public @interface SlowTest {
}
|
cs |
위와같이 커스텀 테그를 만들면 다음과 같이 사용할 수 있다.
|
1
2
3
4
5
|
@SlowTest
@DisplayName("스터디 만들기 slow")
void create1() {
System.out.println("create1");
}
|
cs |
기본적으로 @Tag()는 문자열을 사용하기 때문에 type-safe하지 않다. 따라서 위와 같이 커스텀 어노테이션을 사용하는 것이 좋다.
테스트 반복하기
|
1
2
3
4
5
6
7
|
@DisplayName("스터디 만들기")
//value=반복할 횟수, name=반복할 테스트 이름, {}를 사용하면 js의 템플릿 리터럴 처럼 작동
@RepeatedTest(value = 10, name = "{displayName}, {currentRepetition}/{totalRepetitions}")
void repeatTest(RepetitionInfo repetitionInfo) {
System.out.println("test" + repetitionInfo.getCurrentRepetition() + "/"
+ repetitionInfo.getTotalRepetitions());
}
|
cs |
|
1
2
3
4
5
6
7
8
9
10
11
|
//정한 값을 파라미터로 넘겨서 테스트를 진행한다
@DisplayName("스터디 만들기")
//index: valueSource인자 strings의 인덱스
//displayName: @DisplayName()어노테이션
//{0}: 0번째 파라미터의 현재 값
@ParameterizedTest(name = "{index} {displayName} message={0}")
//파라미터로 넘길 값들
@ValueSource(strings = {"a", "b", "c", "d"})
void parameterizedTest(String message) {
System.out.println(message);
}
|
cs |
@ValueSource말고 @CsvSource()를 사용하면 여러 인자를 넘길 수 있다.
@NullSource를 사용하면 인자로 null을, @EmptySource를 사용하면 빈 문자열을, @NullAndEmptySource를 사용하면 null, 빈문자열을 인자로 넘긴다.
ValueSource는 문자열로 넘길 인자를 설정해도 다음과 같이 암묵적 형변환을 해준다.
JUnit 5 User Guide
Although the JUnit Jupiter programming model and extension model will not support JUnit 4 features such as Rules and Runners natively, it is not expected that source code maintainers will need to update all of their existing tests, test extensions, and cus
junit.org
만약 암묵적 형변환을 해주지 않는 타입으로 형변환을 해야 한다면 SimpleArgumentConverter를 구현해 사용하면 된다. 이는 파라미터가 하나일때만 사용된다.
|
1
2
3
4
5
6
7
8
9
10
11
12
13
14
|
@DisplayName("스터디 만들기")
@ParameterizedTest(name = "{index} {displayName} message={0}")
@ValueSource(ints = {10, 20, 30})
void parameterizedTest(@ConvertWith(StudyConverter.class) Study study) {
System.out.println(study.getLimit());
}
static class StudyConverter extends SimpleArgumentConverter {
@Override
protected Object convert(Object source, Class<?> targetType) throws ArgumentConversionException {
assertEquals(Study.class, targetType, "Can only convert to Study");
return new Study(Integer.parseInt(source.toString()));
}
}
|
cs |
@CsvSource() 사용법
|
1
2
3
4
5
6
7
|
@DisplayName("스터디 만들기")
@ParameterizedTest(name = "{index} {displayName} message={0}")
//문자열 중간에 공백이 있다면 ''으로 감싼다
@CsvSource({"10, java", "20, 'sprint study'"})
void parameterizedTest(Integer limit, String name) {
System.out.println(new Study(limit, name));
}
|
cs |
만약 여러 인자를 조합해 하나의 값으로 받아야 한다면 ArgumentsAccessor를 사용하면 된다.
|
1
2
3
4
5
6
7
|
@DisplayName("스터디 만들기")
@ParameterizedTest(name = "{index} {displayName} message={0}")
@CsvSource({"10, java", "20, 'sprint study'"})
void parameterizedTest(ArgumentsAccessor argumentsAccessor) {
System.out.println(new Study(argumentsAccessor.getInteger(0),
argumentsAccessor.getString(1)));
}
|
cs |
또는 커스텀한 aggregator를 사용하면 된다.
|
1
2
3
4
5
6
7
8
9
10
11
12
13
14
15
|
@DisplayName("스터디 만들기")
@ParameterizedTest(name = "{index} {displayName} message={0}")
@CsvSource({"10, java", "20, 'sprint study'"})
void parameterizedTest(@AggregateWith(StudyAggregator.class) Study study) {
System.out.println(study);
}
//커스텀 aggregator는 반드시 static inner class또는 public class여야 한다
static class StudyAggregator implements ArgumentsAggregator {
@Override
public Object aggregateArguments(ArgumentsAccessor accessor,
ParameterContext context) throws ArgumentsAggregationException {
return new Study(accessor.getInteger(0), accessor.getString(1));
}
}
|
cs |
테스트 인스턴스
테스트 클래스는 기본적으로 내부에 있는 하나의 메서드를 실행할때 마다 인스턴스를 만든다. 이는 테스트간의 의존성을 줄이기 위해서이다. 하지만 인스턴스를 하나만 만들어 공요하는 방법이 존재한다. 클래스에 @TestInstance()어노테이션을 추가하면 된다.
|
1
|
@TestInstance(TestInstance.Lifecycle.PER_CLASS) //클래스마다 하나의 인스턴스만 생성
|
cs |
또 한 이경우 @AfterAll, @BeforeAll에 사용되는 메서드를 static으로 정의할 필요가 없다. 어차피 인스턴스가 하나만 만들어 지기 때문에.
테스트 순서
기본적으로 테스트에는 순서가 존재하기 때문에 정해진 순서대로 실행된다. 하지만 이 순서는 Junit 구현로직에 의존하기 때문에 언제든지 실행 순서가 바뀔 수 있다. 이 순서가 명확하지 않은 이유는 제대로된 유닛테스트는 서로 의존성이 없기 때문이다.
그럼에도 만약 어떤 유스케이스를 검증하기 위해 하나의 인스턴스만을 생성하고 유닛테스트의 순서를 정해야 할 때가 존재한다. 이 경우 @TestMethodOrder()를 사용하면 된다. @TestMethodOrder()의 인자로는 MethodOrder를 넘겨주면 된다. MethodOrder의 기본 구현체로는 Alphanumeric, OrderAnnotaion, Random이 존재한다.
|
1
2
3
4
5
6
7
8
9
10
11
12
13
14
15
16
17
18
|
@TestInstance(TestInstance.Lifecycle.PER_CLASS)
@TestMethodOrder(MethodOrderer.OrderAnnotation.class)
class StudyTest {
@Order(2)
@FastTest
@DisplayName("새로운 스터디 만들기")
public void createNewStudy() {
Study actual = new Study(100);
assertTrue(actual.getLimit() > 0);
}
@Order(1)
@SlowTest
@DisplayName("스터디 만들기 slow")
void create1() {
System.out.println("create1");
}
}
|
cs |
Junit 설정
테스트 코드가 존재하는 디렉토리 내부에 resources디렉토리를 만들거 junit-platform.properties파일을 생성한 뒤 이 파일에 설정을 할 수 있다. 여기에서 한 설정은 모든 테스트에 적용된다.
|
1
2
3
4
5
6
7
8
9
10
11
12
13
|
# 테스트 인스턴스 라이프사이클 설정
junit.jupiter.testinstance.lifecycle.default = per_class
# 확장팩 자동감지
junit.jupiter.extensions.autodetection.enabled = true
# @Disabled 무시, org.junit으로 시작하는 모든 패키지 중 DisabledCondition을 사용하지 않겠다
junit.jupiter.conditions.deactivate = org.junit.*DisabledCondition
# 테스트 이름 표기 전략 수정, @DisplayNameGeneration()같은 역할
# underscore를 빈칸으로 수정
junit.jupiter.displayname.generator.default = \
org.junit.jupiter.api.DisplayNameGenerator$ReplaceUnderscores
|
cs |
Junit5 확장모델
Junit5는 Extension을 통해 확장 모델을 사용할 수있다.
아래와 같이 유닛 테스트가 1초 이상 걸릴 경우 @SlowTest라는 커스텀 어노테이션을 붙이라는 문구를 띄우는 클래스를 만들어 보자.
|
1
2
3
4
5
6
7
8
9
10
11
12
13
14
15
16
17
18
19
20
21
22
23
24
25
26
27
28
29
|
public class FindSlowTestExtension implements BeforeTestExecutionCallback, AfterTestExecutionCallback {
private static final long THRESHOLD = 1000L;
@Override
public void beforeTestExecution(ExtensionContext context) throws Exception {
ExtensionContext.Store store = getStore(context);
store.put("START_TIME", System.currentTimeMillis());
}
@Override
public void afterTestExecution(ExtensionContext context) throws Exception {
String testMethodName = context.getRequiredTestMethod().getName();
ExtensionContext.Store store = getStore(context);
long startTime = store.remove("START_TIME", long.class);
long duration = System.currentTimeMillis() - startTime;
if(duration > THRESHOLD) {
System.out.printf("Please consider mark method [%s] with @SlowTest. \n", testMethodName);
}
}
private ExtensionContext.Store getStore(ExtensionContext context) {
String testClassName = context.getRequiredTestClass().getName();
String testMethodName = context.getRequiredTestMethod().getName();
return context.getStore(ExtensionContext.Namespace.create(
testClassName, testMethodName));
}
}
|
cs |
@ExtendWith를 사용해 확장모델 사용
|
1
2
3
|
@ExtendWith(FindSlowTestExtension.class)
class StudyTest {
}
|
cs |
하지만 이 경우는 별도의 값을 확장모델에 넘겨줄 수 없다. 만약 어떤 값을 인자로 넘겨야 한다면 @RegisterExtension을 사용하면 된다. 이 경우 static 으로 정의해야 한다.
|
1
2
3
4
5
|
class StudyTest {
@RegisterExtension
static FindSlowTestExtension findSlowTestExtension =
new FindSlowTestExtension(1000L);
}
|
cs |