JDBC를 사용하면 코드에는 디비 연동과 관련된 보일러플레이트가 존재한다. 이 단점을 없애기 위해 스프링은 템플릿 메서드 패턴과 전략 패턴을 엮은 JdbcTemplate을 제공한다. 또 한, 트랜잭션 관리를 쉽게 제공한다. 순수 JDBC API를 사용해 트랜잭션을 처리하려면 다음과 같은 과정이 필요하다.
|
1
2
3
4
5
6
7
8
9
10
11
12
13
14
15
16
17
18
19
20
21
22
23
24
25
26
27
28
29
30
31
32
33
34
|
public void insert(Member member) {
Connection connection = null;
PreparedStatement preparedStatement = null;
try {
connection = DriverManager.getConnection(
"jdbc:mysql://localhost/spring4fs?characterEncoding=utf8",
"spring4", "spring4");
connection.setAUtoCommit(false);
// ... 자동 쿼리 비활성화
connection.commti();
} catche(SQLException ex) {
if (connection != null) {
try {
// 트랜잭션 롤백
connection.rollback();
} catch (SQLException e) {
if (PreparedStatement != null) {
try {
preparedStatement.close();
} catch(SQLException e) {
}
}
} finally {
if (preparedStatement != null ){
try {
preparedStatement.close();
} catch (SQLException e) {}
}
if (connection != connection.close, ii)
}
}
}
|
cs |
만약 스프링을 사용한다면 @Transactiona 어노테이션을 사용하면 된다.
커넥션 풀
실제 서비스에서는 서로 다른 장비를 이용해 자바 프로그램과 DBMS를 실행한다. 이때, 자바 프로그램에서 DBMS로 커넥션을 생성하는 시간은 전체 성능에 영향을 줄 수 있따. 또한 동시에 접속하는 상요자수가 많다면, DB 커넥션을 생성해 DBMS에 부하를 준다.
위와 같은 문제를 없애기 위해 커넥션 풀을 사용한다. 커넥션 풀은 일정 개수의 DB 커넥션을 미리 만들어 두고, 필요할 떄 가져와 사용한 뒤 커넥션을 다시 풀에 반납한다. 커넥션 풀을 사용하면 커넥션 생성 시간을 아낄 수 있고 많은 커넥션 생성으로 인한 부하를 방지할 수 있다. Tomcat JDBC, HikariCP 등이 커넥션 풀 기능을 제공한다.
스프링 부트 2.0 이전에는 TomCat JDBC를 사용했지만, 그 이후 부터는 Hikari CP를 사용한다. Hikari CP 벤치마킹 페이지를 보면, 다른 커넥션풀 관리 방식에 비해 월등히 빠른 것을 볼 수 있다.
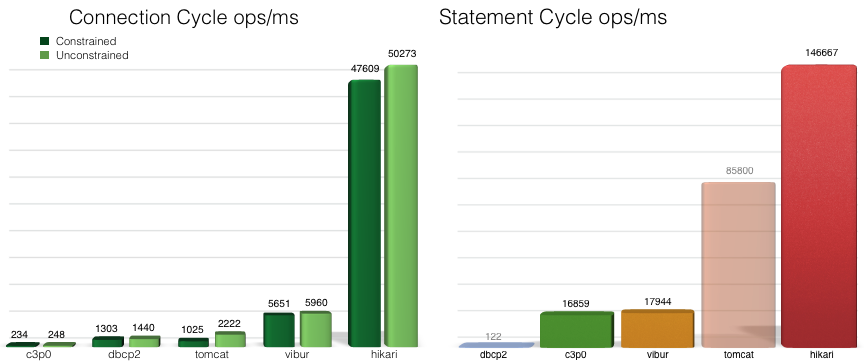
Hikari CP가 유독 빠른 이유는 Connection 객체를 감싼 PoolEntry로 Connection을 관리하고, ConcurrentBag을 사용해 PoolEntry를 관리하고 있기 떄문이다.
|
1
2
3
4
5
6
7
8
9
10
11
12
13
14
15
16
17
18
|
final class PoolEntry implements IConcurrentBagEntry {
...
Connection connection;
...
PoolEntry(final Connection connection, final PoolBase pool, final boolean isReadOnly, final boolean isAutoCommit) {
this.connection = connection;
this.hikariPool = (HikariPool) pool;
this.isReadOnly = isReadOnly;
this.isAutoCommit = isAutoCommit;
this.lastAccessed = currentTime();
this.openStatements = new FastList<>(Statement.class, 16);
}
...
}
|
cs |
아래 코드는 HikairPool에서 PoolEntry를 가져오는 코드다.
|
1
2
3
4
5
6
7
8
9
10
11
12
13
14
15
16
17
18
19
20
21
22
23
24
25
26
27
28
29
30
31
32
33
34
35
36
37
38
39
40
41
|
public final class HikariPool extends PoolBase implements HikariPoolMXBean, IBagStateListener {
...
// Get a connection from the pool, or timeout after the specified number of milliseconds.
public Connection getConnection(final long hardTimeout) throws SQLException {
suspendResumeLock.acquire();
final long startTime = currentTime();
try {
long timeout = hardTimeout;
do {
PoolEntry poolEntry = connectionBag.borrow(timeout, MILLISECONDS);
if (poolEntry == null) {
break; // We timed out... break and throw exception
}
final long now = currentTime();
if (poolEntry.isMarkedEvicted() || (elapsedMillis(poolEntry.lastAccessed, now) > aliveBypassWindowMs && !isConnectionAlive(poolEntry.connection))) {
closeConnection(poolEntry, poolEntry.isMarkedEvicted() ? EVICTED_CONNECTION_MESSAGE : DEAD_CONNECTION_MESSAGE);
timeout = hardTimeout - elapsedMillis(startTime);
}
else {
metricsTracker.recordBorrowStats(poolEntry, startTime);
return poolEntry.createProxyConnection(leakTaskFactory.schedule(poolEntry), now);
}
} while (timeout > 0L);
metricsTracker.recordBorrowTimeoutStats(startTime);
throw createTimeoutException(startTime);
}
catch (InterruptedException e) {
Thread.currentThread().interrupt();
throw new SQLException(poolName + " - Interrupted during connection acquisition", e);
}
finally {
suspendResumeLock.release();
}
}
...
}
|
cs |
HikariPool.getConnnection()은 ConcurrentBag.borrow()를 호출해 사용 가능한 Connection을 반환한다.
|
1
2
3
4
5
6
7
8
9
10
11
12
13
14
15
16
17
18
19
20
21
22
23
24
25
26
27
28
29
30
31
32
33
34
35
36
37
38
39
40
41
42
43
44
45
46
47
48
49
50
51
52
|
public class ConcurrentBag<T extends IConcurrentBagEntry> implements AutoCloseable {
...
// The method will borrow a BagEntry from the bag, blocking for the specified timeout
// if none are available.
public T borrow(long timeout, final TimeUnit timeUnit) throws InterruptedException {
// Try the thread-local list first
final List<Object> list = threadList.get();
for (int i = list.size() - 1; i >= 0; i--) {
final Object entry = list.remove(i);
@SuppressWarnings("unchecked")
final T bagEntry = weakThreadLocals ? ((WeakReference<T>) entry).get() : (T) entry;
if (bagEntry != null && bagEntry.compareAndSet(STATE_NOT_IN_USE, STATE_IN_USE)) {
return bagEntry;
}
}
// Otherwise, scan the shared list ... then poll the handoff queue
final int waiting = waiters.incrementAndGet();
try {
for (T bagEntry : sharedList) {
if (bagEntry.compareAndSet(STATE_NOT_IN_USE, STATE_IN_USE)) {
// If we may have stolen another waiter's connection, request another bag add.
if (waiting > 1) {
listener.addBagItem(waiting - 1);
}
return bagEntry;
}
}
listener.addBagItem(waiting);
timeout = timeUnit.toNanos(timeout);
do {
final long start = currentTime();
final T bagEntry = handoffQueue.poll(timeout, NANOSECONDS);
if (bagEntry == null || bagEntry.compareAndSet(STATE_NOT_IN_USE, STATE_IN_USE)) {
return bagEntry;
}
timeout -= elapsedNanos(start);
} while (timeout > 10_000);
return null;
}
finally {
waiters.decrementAndGet();
}
}
...
}
|
cs |
DataSource 설정
스프링이 제공하는 DB 연동 기능은 DataSource를 사용해 DB Connection을 구한다. DB 연동에 사용할 DatatSource를 스프링 빈으로 등록하고 DB 연동 기능을 구현한 빈 객체는 DataSource를 주입받아 사용한다.
org.springframework.boot.autoconfigure.jdbc의 DataSourceConfiguration을 보면 여러 DataSource의 구현 클래스를 빈으로 등록하고 있다. 그 중, hikariDataSource를 빈으로 등록하는 코드는 다음과 같다.
|
1
2
3
4
5
6
7
8
9
10
11
12
13
14
15
16
17
18
19
20
21
22
23
24
25
|
abstract class DataSourceConfiguration {
...
@Configuration(proxyBeanMethods = false)
@ConditionalOnClass(HikariDataSource.class)
@ConditionalOnMissingBean(DataSource.class)
@ConditionalOnProperty(name = "spring.datasource.type", havingValue = "com.zaxxer.hikari.HikariDataSource",
matchIfMissing = true)
static class Hikari {
@Bean
@ConfigurationProperties(prefix = "spring.datasource.hikari")
HikariDataSource dataSource(DataSourceProperties properties) {
HikariDataSource dataSource = createDataSource(properties, HikariDataSource.class);
if (StringUtils.hasText(properties.getName())) {
dataSource.setPoolName(properties.getName());
}
return dataSource;
}
}
...
}
|
cs |
HikairCP 사용 시 다음과 같은 application.yml에 설정값을 추가할 수 있다.
|
1
2
3
4
5
6
7
8
9
10
11
12
13
14
15
16
17
18
|
spring:
datasource:
hikari:
# 죄대 pool size (default 10)
maximum-pool-size: 10
# 커넥션 연결에 소비되는 최대 시간
connection-timeout: 5000
# 연결 확인을 위한 초기 쿼리
connection-init-sql: SELECT 1
validation-timeout: 2000
# 연결 풀에서 HikariCP가 유지 관리하는 최수 유유 연결 수
minimum-idle: 10
# 연결을 위한 최대 유휴 시간
idle-timeout: 600000
# 닫힌 후 pool 에 있는 connection의 최대 수명(ms)
max-lifetime: 1800000
# auto commit 여부 (default 10)
auto-commit: false
|
cs |
트랜잭션 처리
스프링이 제공하는 @Transactional 어노테이션을 사용하면 트랜잭션 범위를 지정할 수 있다. 트랜잭션 범위에서 실행하고 싶은 메서드에 해당 어노테이션을 붙이면 된다.
정상적인 @Transactional 어노테이션 동작을 위해선 다음 두 가진 내용을 스프링 설정에 추가해야 한다.
1. 플랫폼 트랜잭션 매니저(PlatformTransactionManager) 빈 설정
2. @Transactional 어노테이션 활성화 설정
PlatformTransactionManager는 스프링이 제공하는 트랜잭션 매니저 인터페이스다. 스프링은 구현 기술과 관련 없이 동일한 방식으로 트랜잭션을 처리하기 위해 이 인터페이스를 사용한다. @EnableTransactionManagement 어노테이션은 @Transactional 어노테이션이 붙은 메서드를 트랜잭션 범위에서 실행하는 기능을 활성화 한다. 등록된 PlatformTrasactionManager 빈을 사용해 트랜잭션을 적용한다.
그런데, 스프링 부트를 사용하면 이런 별도의 설정 없이 @Transactional을 사용하는 것만으로도 트랜잭션 처리가 된다. 따라서 내부적으로 PlatformTransactionManager가 빈으로 등록되 있고, 어디에선가는 @EnableTransactionManagement 어노테이션이 사용되고 있음을 짐작할 수 있다. 그래서 뜯어보자.
DataSourceTransactionManager는 DataSourceTransactionManagerAutoConfiguration 에서 빈으로 등록되며 코드는 다음과 같다.
|
1
2
3
4
5
6
7
8
9
10
11
12
13
14
15
16
17
18
19
20
21
22
23
24
25
|
@Configuration(proxyBeanMethods = false)
@ConditionalOnClass({ JdbcTemplate.class, TransactionManager.class })
@AutoConfigureOrder(Ordered.LOWEST_PRECEDENCE)
@EnableConfigurationProperties(DataSourceProperties.class)
public class DataSourceTransactionManagerAutoConfiguration {
@Configuration(proxyBeanMethods = false)
@ConditionalOnSingleCandidate(DataSource.class)
static class JdbcTransactionManagerConfiguration {
@Bean
@ConditionalOnMissingBean(TransactionManager.class)
DataSourceTransactionManager transactionManager(Environment environment, DataSource dataSource,
ObjectProvider<TransactionManagerCustomizers> transactionManagerCustomizers) {
DataSourceTransactionManager transactionManager = createTransactionManager(environment, dataSource);
transactionManagerCustomizers.ifAvailable((customizers) -> customizers.customize(transactionManager));
return transactionManager;
}
private DataSourceTransactionManager createTransactionManager(Environment environment, DataSource dataSource) {
return environment.getProperty("spring.dao.exceptiontranslation.enabled", Boolean.class, Boolean.TRUE)
? new JdbcTransactionManager(dataSource) : new DataSourceTransactionManager(dataSource);
}
}
}
|
cs |
@EnableTransactionManagement 은 TransactionAutoConfiguration 내에 존재하는 EnableTransactionManagementConfiguration nested class 내에서 사용되고 있다.
|
1
2
3
4
5
6
7
8
9
10
11
12
13
14
15
16
17
18
19
20
21
22
23
24
25
26
27
28
29
30
31
32
33
34
35
36
37
38
39
40
41
42
43
|
@Configuration(proxyBeanMethods = false)
@ConditionalOnClass(PlatformTransactionManager.class)
@AutoConfigureAfter({ JtaAutoConfiguration.class, HibernateJpaAutoConfiguration.class,
DataSourceTransactionManagerAutoConfiguration.class, Neo4jDataAutoConfiguration.class })
@EnableConfigurationProperties(TransactionProperties.class)
public class TransactionAutoConfiguration {
...
@Configuration(proxyBeanMethods = false)
@ConditionalOnSingleCandidate(PlatformTransactionManager.class)
public static class TransactionTemplateConfiguration {
@Bean
@ConditionalOnMissingBean(TransactionOperations.class)
public TransactionTemplate transactionTemplate(PlatformTransactionManager transactionManager) {
return new TransactionTemplate(transactionManager);
}
}
@Configuration(proxyBeanMethods = false)
@ConditionalOnBean(TransactionManager.class)
@ConditionalOnMissingBean(AbstractTransactionManagementConfiguration.class)
public static class EnableTransactionManagementConfiguration {
@Configuration(proxyBeanMethods = false)
@EnableTransactionManagement(proxyTargetClass = false)
@ConditionalOnProperty(prefix = "spring.aop", name = "proxy-target-class", havingValue = "false")
public static class JdkDynamicAutoProxyConfiguration {
}
@Configuration(proxyBeanMethods = false)
@EnableTransactionManagement(proxyTargetClass = true)
@ConditionalOnProperty(prefix = "spring.aop", name = "proxy-target-class", havingValue = "true",
matchIfMissing = true)
public static class CglibAutoProxyConfiguration {
}
}
}
|
cs |
또 한, 트랜잭션 시작과 롤백을 별도로 명시하지 않아도 되는 이유는 DataSourceTransactinoManager가 이 기능을 지원하기 때문이다.
|
1
2
3
4
5
6
7
8
9
10
11
12
13
14
15
16
17
18
19
20
21
22
23
24
25
26
27
28
29
30
31
32
33
34
35
36
|
public class DataSourceTransactionManager extends AbstractPlatformTransactionManager
implements ResourceTransactionManager, InitializingBean {
...
@Override
protected void doCommit(DefaultTransactionStatus status) {
DataSourceTransactionObject txObject = (DataSourceTransactionObject) status.getTransaction();
Connection con = txObject.getConnectionHolder().getConnection();
if (status.isDebug()) {
logger.debug("Committing JDBC transaction on Connection [" + con + "]");
}
try {
con.commit();
}
catch (SQLException ex) {
throw translateException("JDBC commit", ex);
}
}
@Override
protected void doRollback(DefaultTransactionStatus status) {
DataSourceTransactionObject txObject = (DataSourceTransactionObject) status.getTransaction();
Connection con = txObject.getConnectionHolder().getConnection();
if (status.isDebug()) {
logger.debug("Rolling back JDBC transaction on Connection [" + con + "]");
}
try {
con.rollback();
}
catch (SQLException ex) {
throw translateException("JDBC rollback", ex);
}
}
...
}
|
cs |
@Transactional과 프록시
@Transactional 어노테이션을 이용해 트랜잭션을 처리하기 위해 내부적으로 AOP를 사용한다. @Transactional 어노테이션을 적용하기 위해 @EnableTransactionManagement 태그를 사용하면 @Transactional 어노테이션이 적용된 빈 객체를 찾아 알맞은 프록시 객체를 생성한다.
다음과 같은 예제를 보자.
|
1
2
3
4
5
6
7
8
9
10
11
12
13
14
15
16
17
18
19
20
21
22
23
24
25
26
27
28
29
30
31
32
|
@Configuration
@EnableTransactionManagement
public class ApplicationContext {
...
@Bean
public ChangePasswordService changePasswordService() {
ChangePasswordService passwordService = new ChangePasswordService();
passwordService.setMemberDao(memberDao());
return passwordService;
}
}
public class MainForChangePassword {
public static void main(String[] args) {
AnnotationConfigApplicationContext context =
new ApplicationContext(ApplicationContext.class);
ChangePasswordService changePasswordService =
context.getBeans("changePasswordService", ChangePasswordService.class);
try {
changePasswordService.cahngePassword("example@example.com", "1234", "1111");
} catch (MemberNotFoundException e ) {
} catch (WrongIdPasswordException e) {
}
}
}
|
cs |
이 예제의 경우 다음과 같은 구조로 프록시를 사용하게 된다.
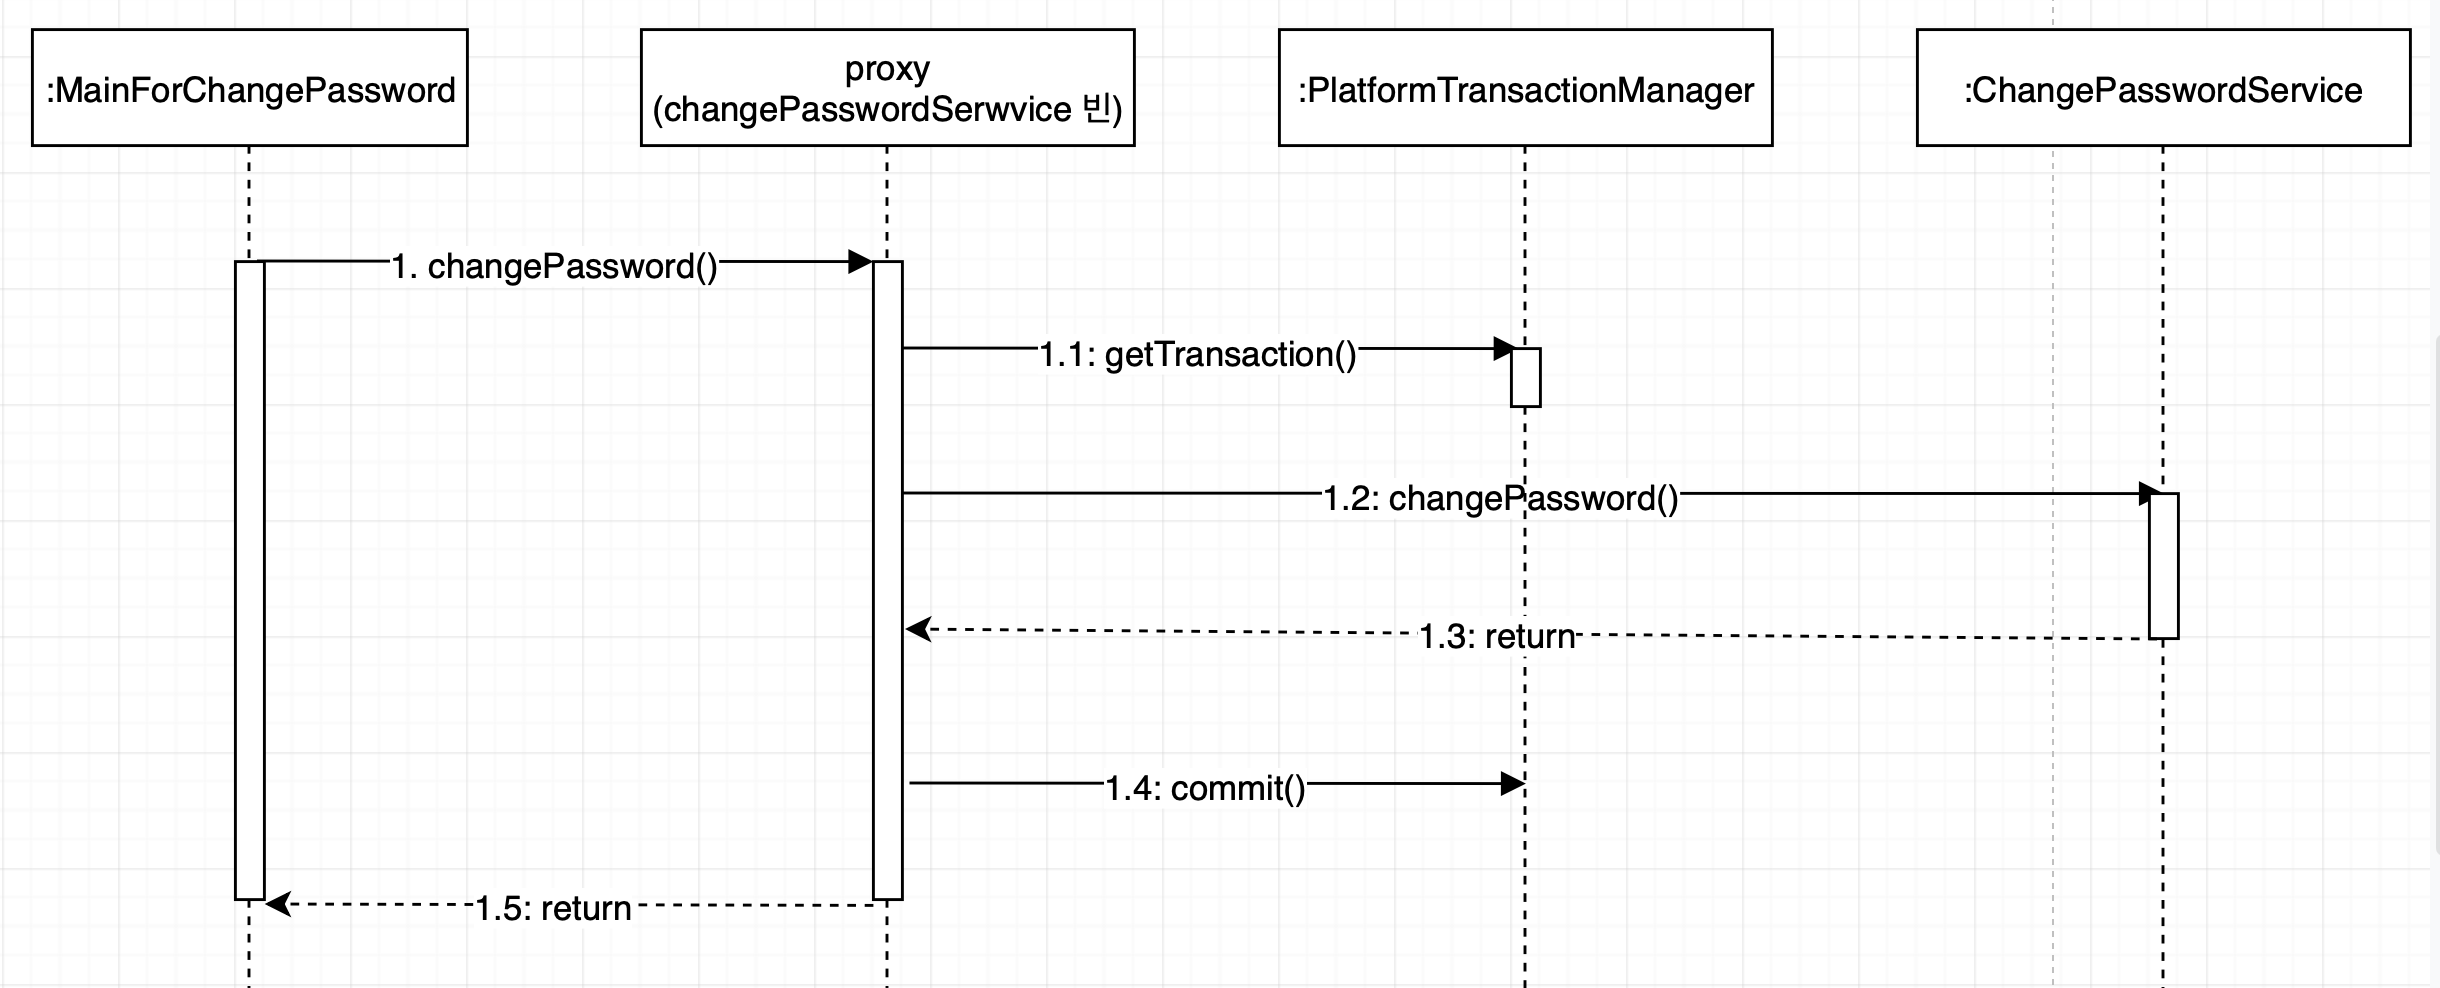
프록시 객체는 @Transactional 어노테이션이 붙은 메서드를 호출하면 PlatformTransactionManager를 사용해 트랜잭션을 시작한다. 그 후 실제 객체의 메서드를 호출하고 성공적으로 실행되는 트랜잭션을 커밋한다.
트랜잭션이 롤백이 된다면, 다음과 같은 과정을 거친다.
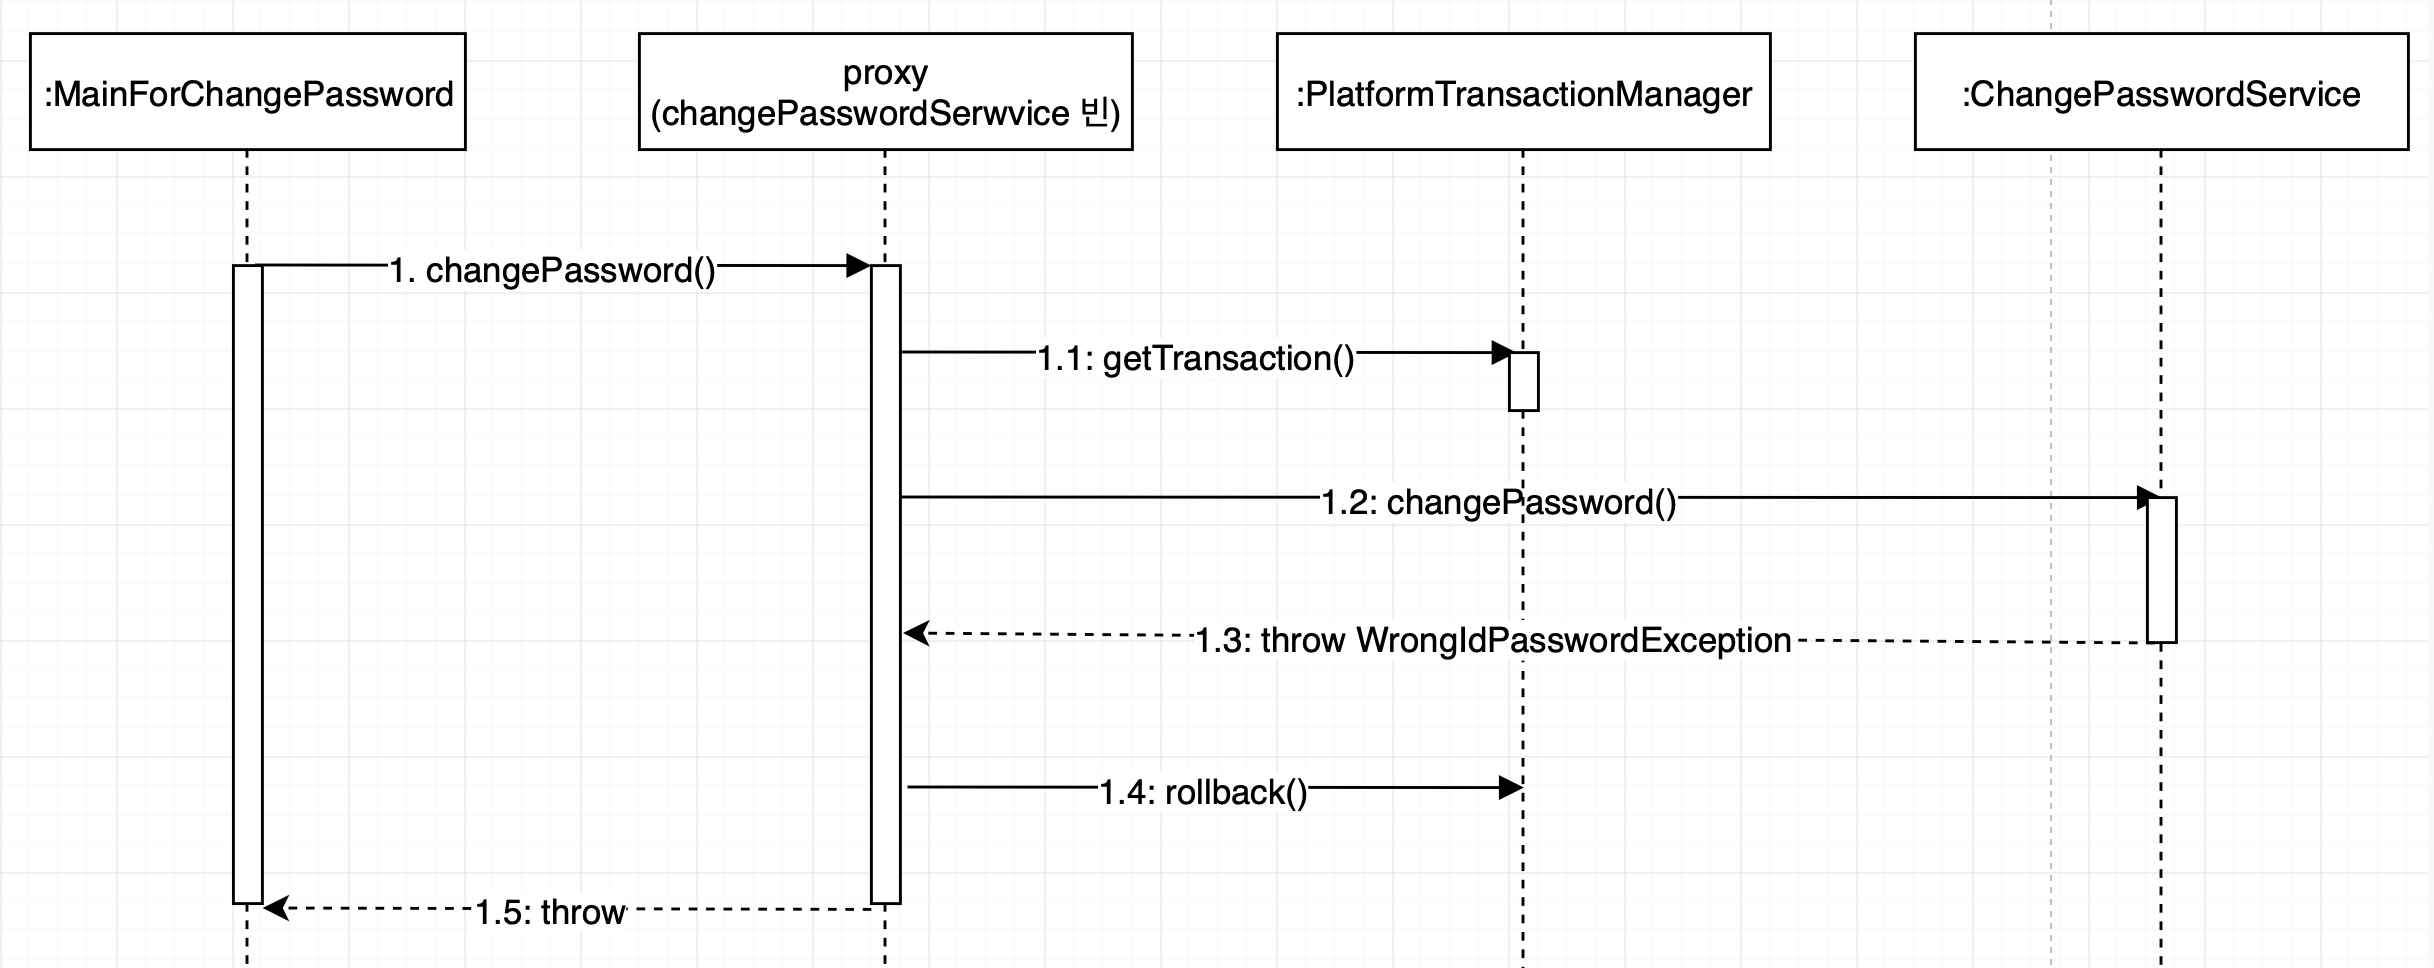
별도의 설정이 없다면 RuntimeException만 롤백인 된다. 만약 특정 에러를 롤백시키고 싶다면 @Transactional 어노테이션에서 rollbackFor 속성을 사용해 지정할 수 없다. 이와 반대로 특정 에러는 롤백을 하고 싶지 않다면 noRollbackFor 속성을 사용하면 된다.
@Transactional의 주요 속성
| 속성 | 타입 | 설명 |
| value | String | 트랜잭션을 관리할 떄 사용할 PlatformTransactionManager 빈의 이름을 지정한다. 디폴트값: "" |
| propagation | Propagation | 트랜잭션 전파 타입을 지정한다. 디폴트값은 Propagarion.REQUIRED 이다 |
| isolation | Isolation | 트랜잭션 격리 레벨을 지정한다. 디폴트값은 Isolatino.DEFAULT 이다. |
| timeout | int | 트랜잭션 제한 시간을 지정한다. 디폴트값은 -1로 데이터베이스의 타임아웃 시간을 사용한다. 단위는 초다. |
@Transactional 어노테이션의 value 속성값이 없으면 등록된 빈 중에 타입이 PlatformTransactionManager인 빈을 사용한다.
Propagation 열거 타입에 정의되있는 값 목록은 다음과 같다.
| 값 | 설명 |
| REQUIRED | 메서드를 수행하는 데 트랜잭션이 필요하다는 것을 의미한다. 현재 진행 중인 트랜잭션이 존재하면 해당 트랜잭션을 사용한다. 존재하지 않으면 새로운 트랜잭션을 생성한다. |
| MANDATORY | 메서드를 수행하는 데 트랜잭션이 필요하다는 것을 의미한다. 하지만 REQUIRED와 달리 진행중인 트랜잭션이 존재하지 않을 경우 익셉션이 발생한다. |
| REQUIRES_NEW | 항상 새로운 트랜잭션을 시작한다. 진행중인 트랜잭션이 존재하면 기존 트랜잭션을 일시 중지하고 새로운 트랜잭션을 시작한다. 새로 시작도니 트랜잭션이 종료된 뒤에 기존 트랜잭션이 계속된다. |
| SUPPORTS | 메서드가 트랜잭션을 필요로 하지는 않지만, 진행중인 트랜잭션이 존재하면 트랜잭션을 사용한다는 것을 의미한다. 진행중인 트랜잭션이 존재하지 않아도 메서드는 정상적으로 동작한다. |
| NOT_SUPPORTED | 메서드가 트랜잭션을 필요로 하지 않음을 의미한다. SUPPORTS와 달리 진행 중인 트랜잭션이 존재할 경우 메서드가 실행되는 동안 트랜잭션은 일시 중지되고 메서드 실행이 종료된 후에 트랜잭션을 계속 진행한다. |
| NEVER | 메서드가 트랜잭션을 필요로 하지 않는다. 만약 진행중인 트랜잭션이 존재하면 익셉션이 발생한다. |
| NESTED | 진행중인 트랜잭션이 존재하면 기존 트랜잭션에 중첩된 트랜잭션에서 메서드를 실행한다. 진행 중인 트랜잭션이 존재하지 않으면 REQUIRED와 동일하게 동작한다. 이는 JDBC 3.0 드라이버를 사용할 때만 동작한다. |
Isolation 열거 타입에 정의된 값은 다음과 같다.
| 값 | 설명 |
| DEFAULT | 기본 설정을 사용한다. |
| READ_UNCOMMITTED | 다른 트랜잭션이 커밋하지 않은 데이터를 읽을 수 있다. |
| READ_COMMITTED | 다른 트랜잭션이 커밋한 데이터를 읽을 수 있다. |
| REPEATABLE_READ | 처음에 읽어 온 데이터와 두 번쨰 읽어 온 데이터가 동일한 값을 갖는다. |
| SERIALIZABLE | 동일한 데이터에 대해 동시에 두 개 이상의 트랜잭션을 수행할 수 있다. |
@EnableTransactionManagement 어노테이션의 주요 속성
| 속성 | 설명 |
| proxyTargetClass | 클래스를 이용해 프록시를 생성할지 여부를 지정한다. 기본값은 false로서 인터페이스를 이용해 프록시를 생성한다. |
| order | AOP 적용 순서를 지정한다. 기본값은 가장 낮은 우선순위에 해당하는 int의 최댓값이다. |
트랜잭션 전파
|
1
2
3
4
5
6
7
8
9
10
11
12
13
14
15
16
17
18
19
20
21
22
23
24
25
26
27
28
29
30
31
32
33
34
35
36
37
38
|
public class SomeService {
private AnyService anyService;
@Transactional
public void some() {
anyService.any();
}
public void steAnyService(AnyService anyService) {
this.anyService = anyService;
}
}
public class AnyService {
@Transactional
public void any() {
...
}
}
@Configuration
@EnableTransactionManagement
public class Config {
@Bean
public SomeService some() {
SomeService some = new SomeService();
some.setAnyService(any());
return some;
}
@Bean
public AnyService any() {
return new AnyService();
}
}
|
cs |
SomeService 클래스와 AnyService 클래스는 둘 다 @Transactional 어노테이션을 적용하고 있다. 따라서 SomeService의 some() 메서드 호출과 AnyService의 any() 메서드 호출 모두 트랜잭션이 시작된다고 생각할 수 있다. 새로운 트랜잭션 시작 여부는 @Transactional의 propagation 속성에 따라 달라진다.
출처 - 초보 웹 개발자를 위한 스프링5 프로그래밍 입문